Chromateq

CLUB SPI

USB TO SPI & DMX

The mix of SPI and DMX controllers in Live and Standalone

CLUB SPI is a USB-to-SPI stand-alone interface with both SPI and DMX512 (RDM) ports in one device, used to control or drive LED lighting and LED strip installations. Connected to a computer running Chromateq software (PRO DMX 2, PIXXEM, STUDIO DMX), it converts data directly to SPI format — up to 3072 channels, 1020 RGB or 768 RGBW pixels, at 15 fps — replacing a separate DMX controller paired with a DMX-to-SPI driver.

As a standard DMX-to-SPI LED driver, CLUB SPI takes a 512-channel DMX-RDM universe as input and outputs up to 170 RGB or 128 RGBW pixels across its 3072-channel SPI output, with pixel grouping and channel repeat both configurable from 1 to 3072.

In stand-alone mode, CLUB SPI records a show to its internal memory and plays it back without a computer at up to 25 fps, triggered by DMX input, up to 3 smart dry contacts, or an infrared remote (play/stop/pause, dimmer, speed).

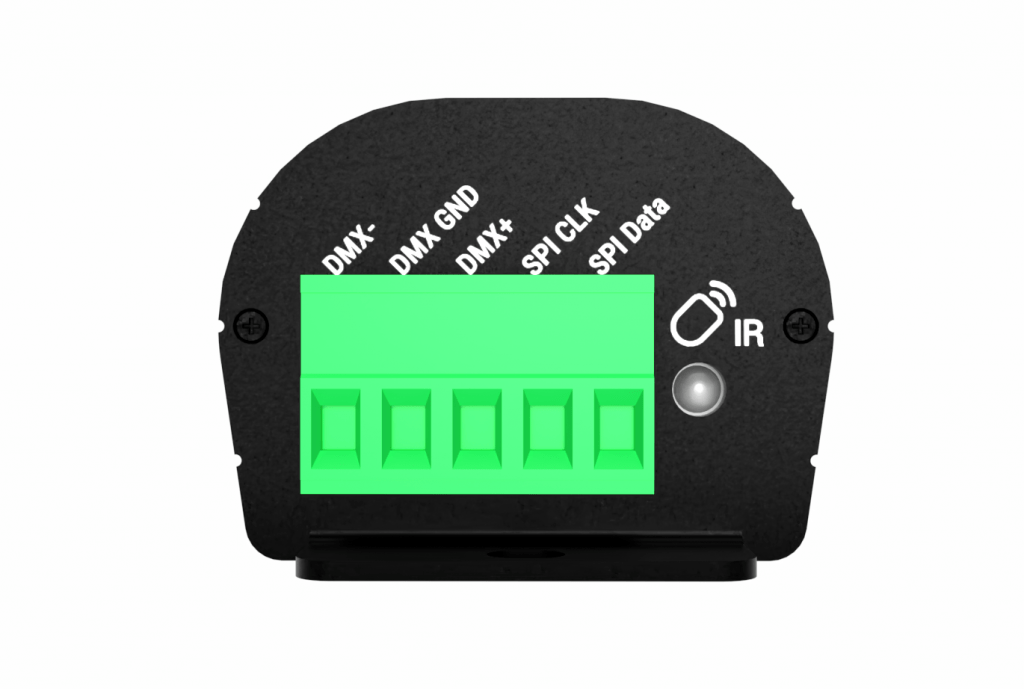
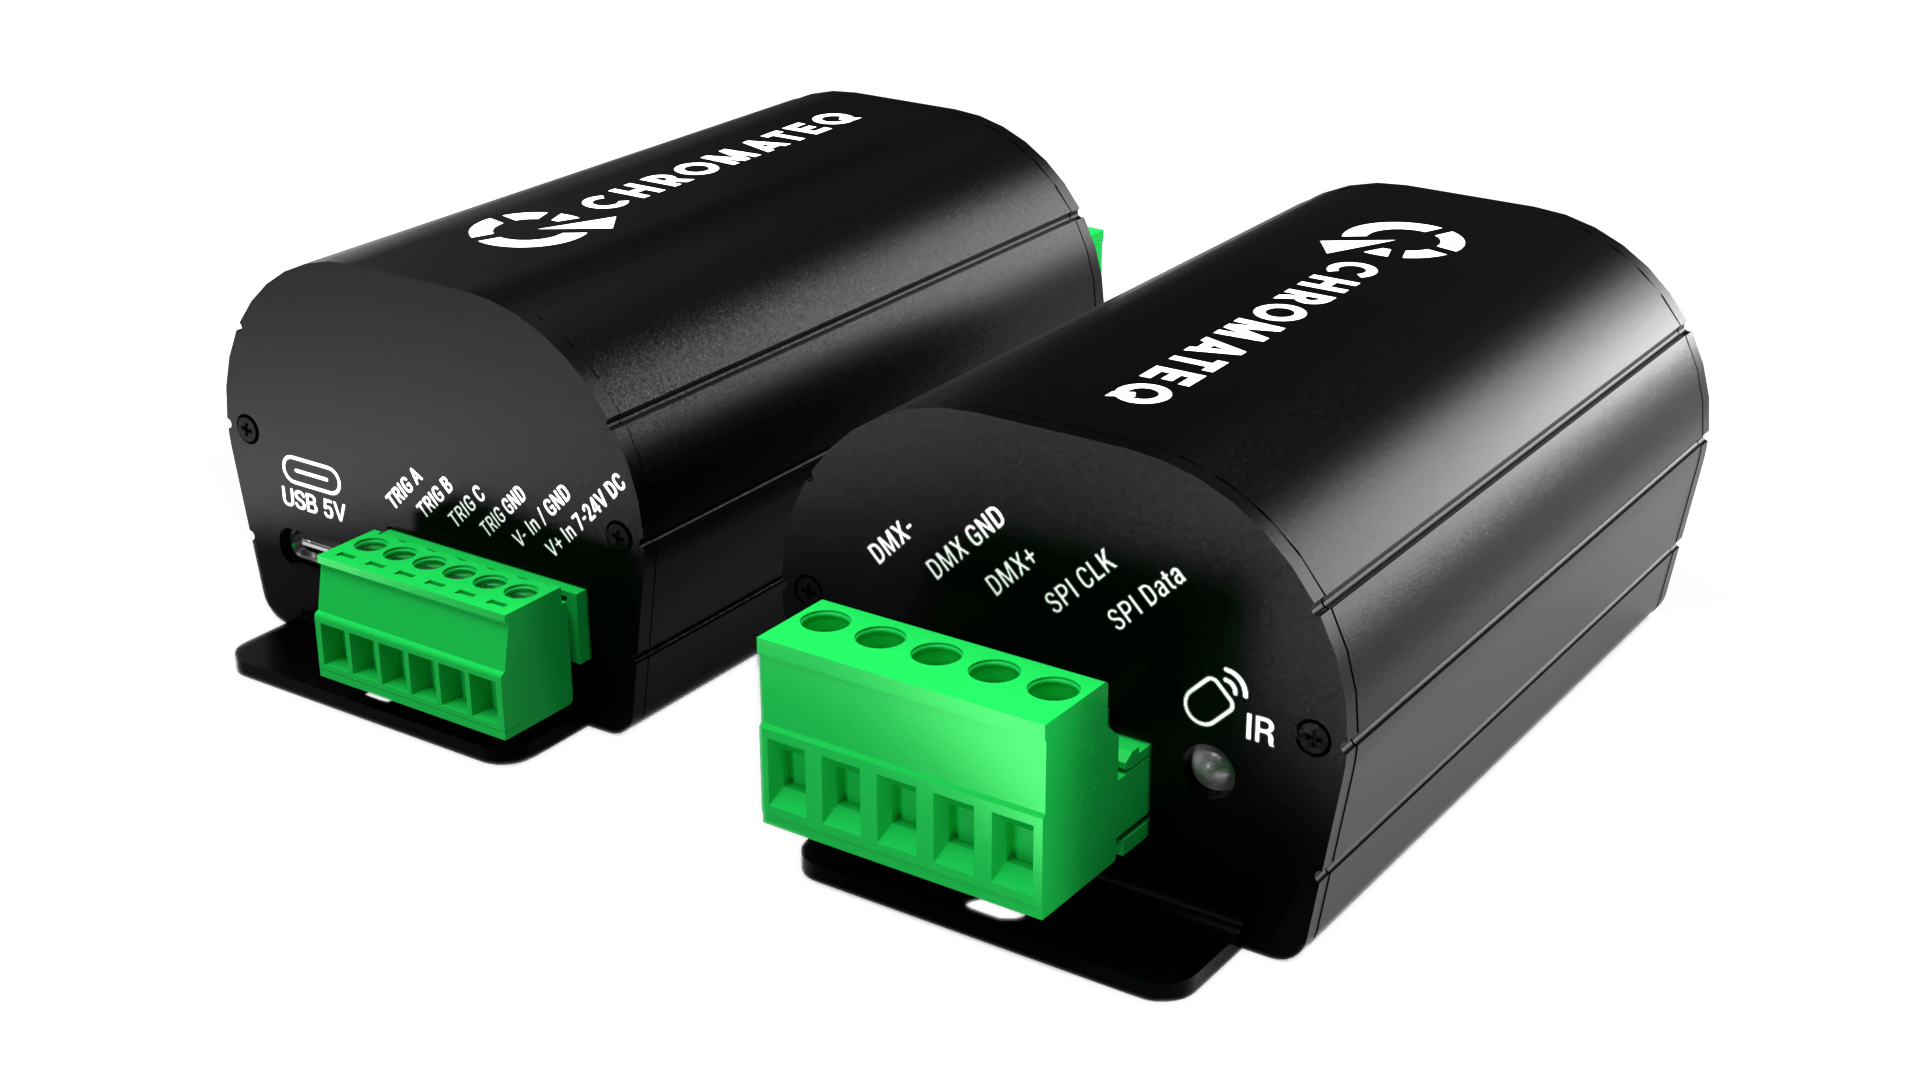
Screw Terminal Block
1. DMX - 
2. DMX Ground
3. DMX +
4. SPI Clock
5. SPI Data

 Infrared Receiver LED

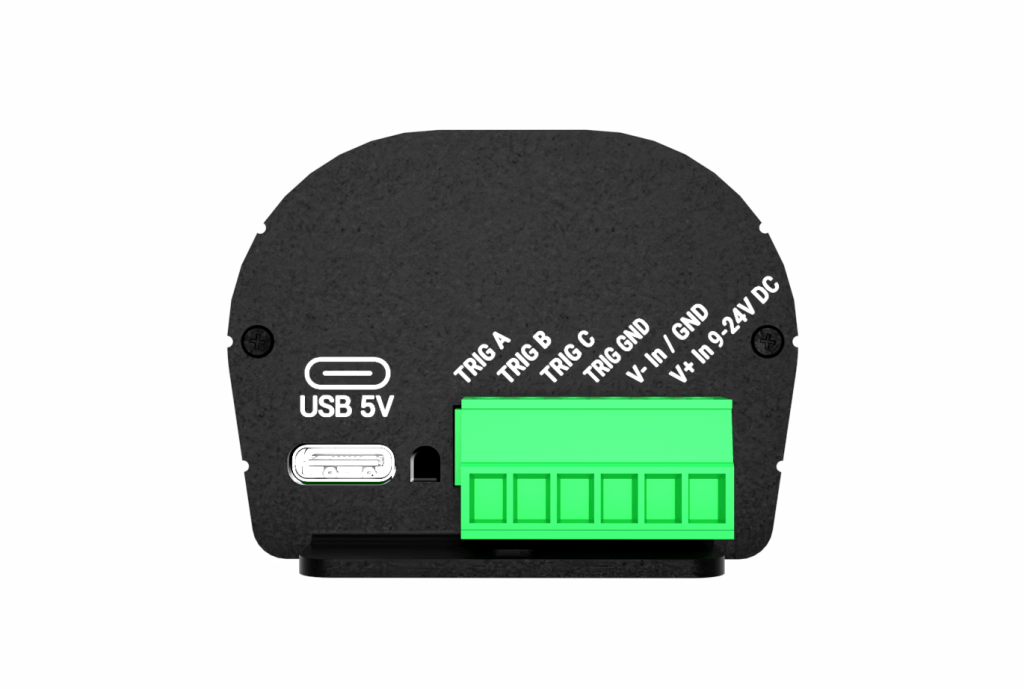
Screw Terminal Block
1. Trigger A
2. Trigger B
3. Trigger C
4. Trigger Ground
5. V- Input / Ground
6. V+ Input / 9-24 V DC

Discover and compare Chromateq devices.

Wiring Diagrams

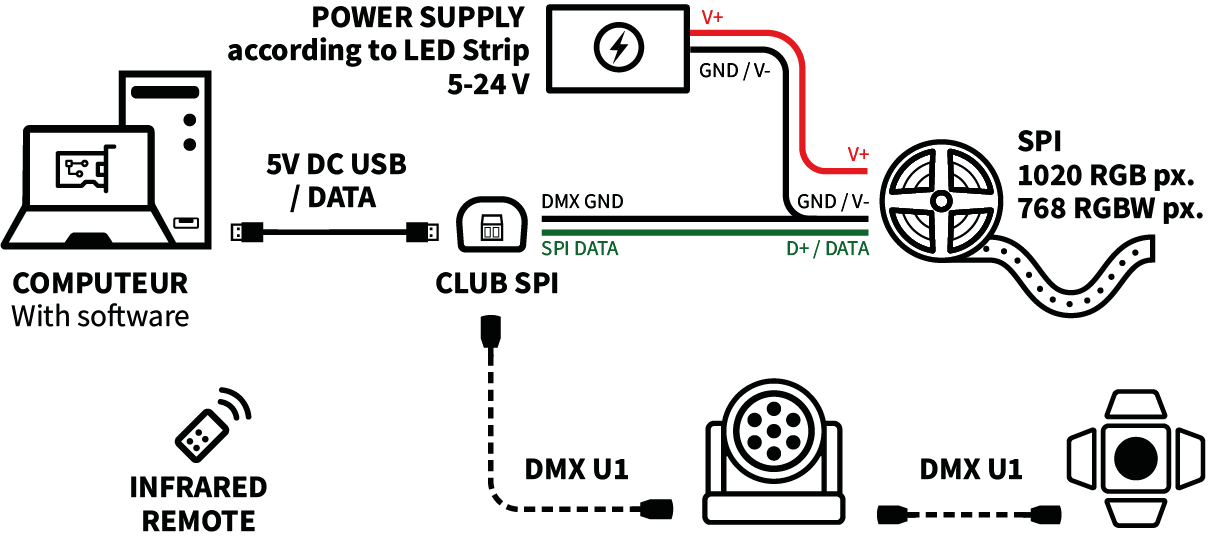
LIVE Mode, when connected to the computer.

SPI live wiring diagram

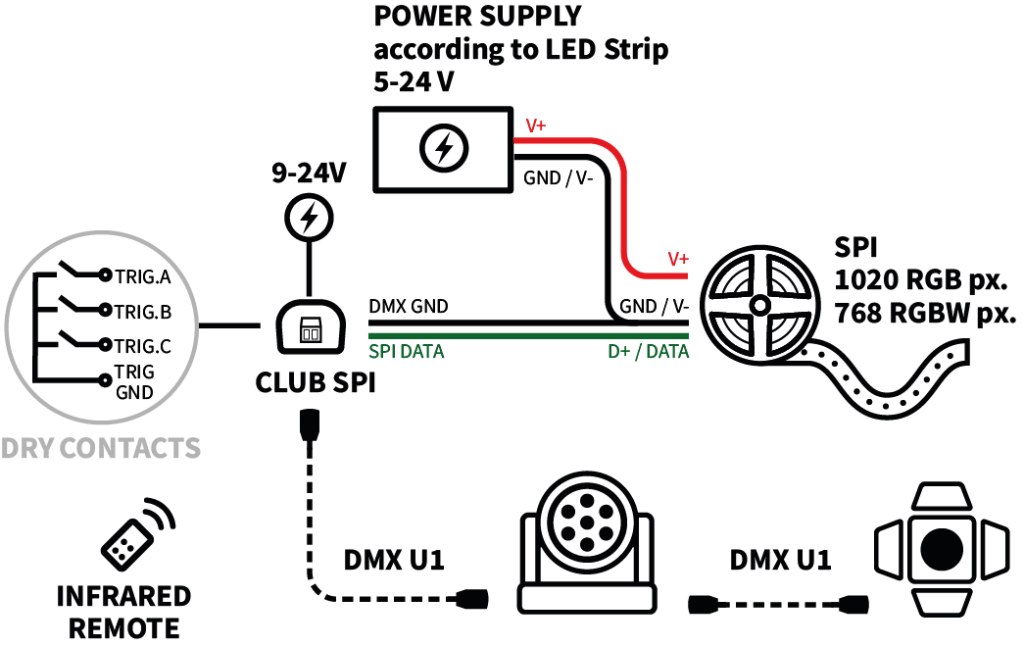
Stand Alone mode, without computer and play from memory

SPI stand-alone wiring diagram

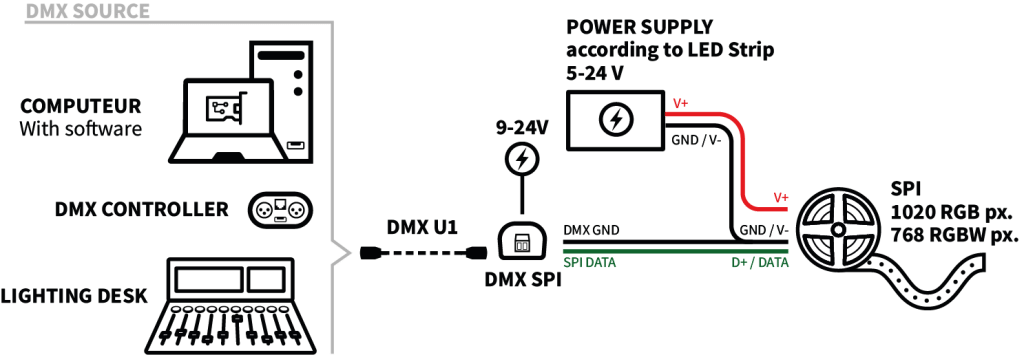
LED Driver mode, convert DMX to SPI directly

SPI driver wiring diagram

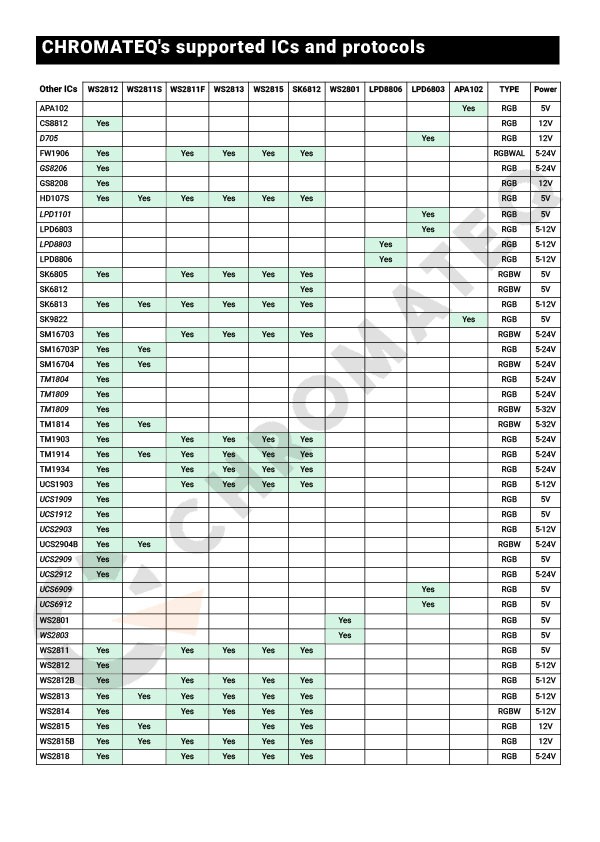
Supported protocoles and ICs

CLUB SPI Configuration

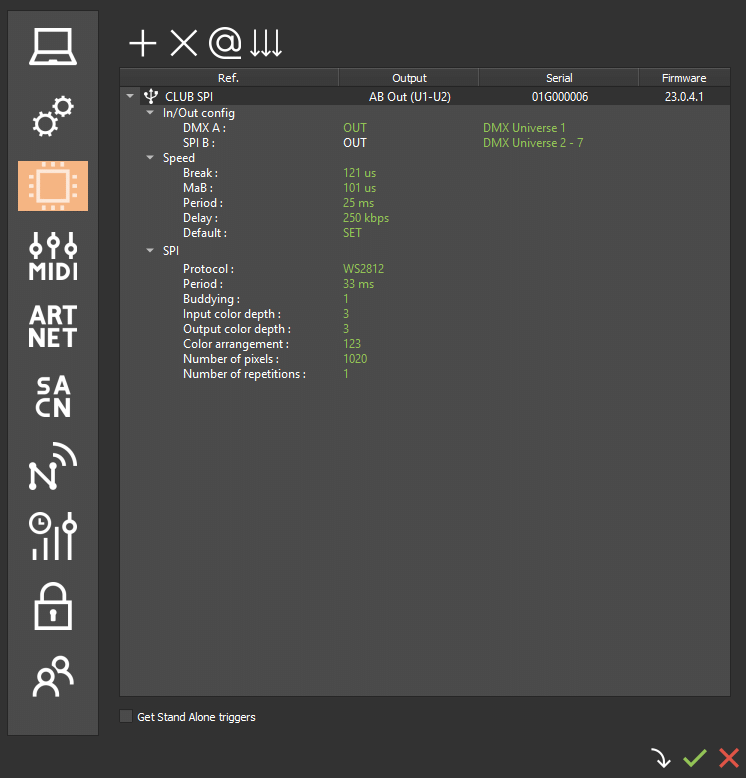
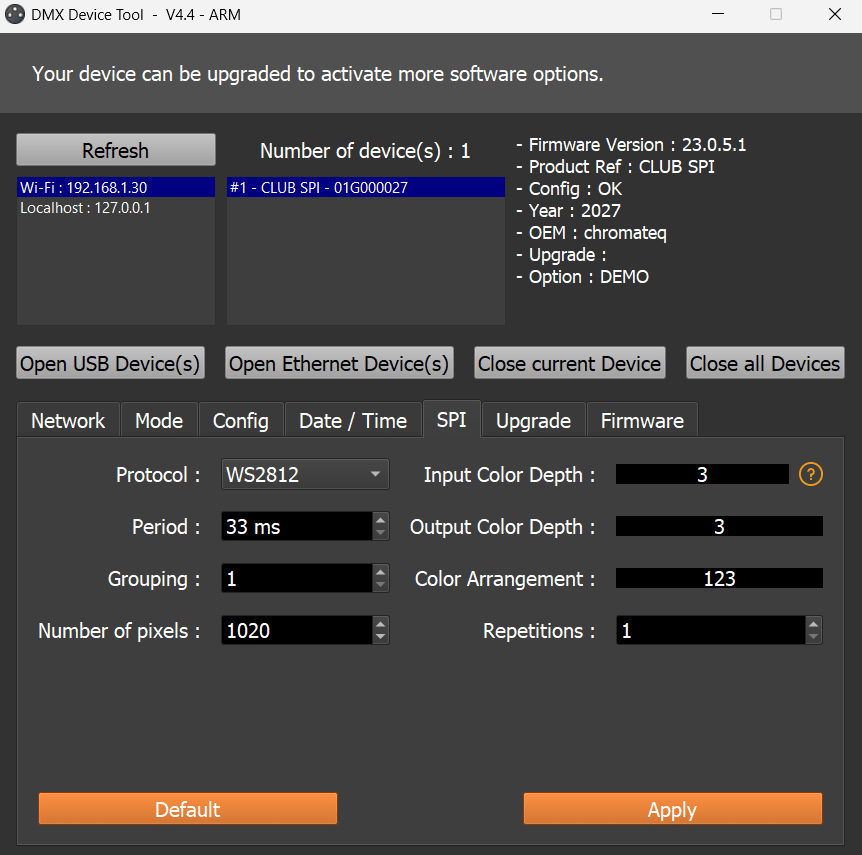
The CLUB SPI’s options window in PRO DMX 2 and DEVICETOOL provides all the device configuration and informations of the DMX and SPI interface.

DMX & SPI Output configuration:

  • DMX A: DMX input or output and associated univers.
  • SPI B: Output only and associated universes.


DMX Settings:

  • Timing parameters: Break, MaB, Period.
  • Active DMX universes number (U1 to U7).


SPI Settings:

  • SPI Protocol: LED IC (WS2812, SK, TM, UCS…).
  • Period: data refresh rate.
  • Buddying: pixel grouping.
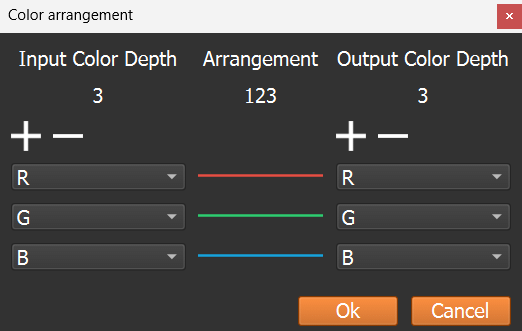
  • Colour depth: input and output bit depth.
  • Colour arrangement: channel order (RGB, GRB, BRG…).
  • Number of pixels: total LED count.
  • Repetitions: signal duplication for mirrored layouts.

With all the configuration parameters,  the CLUB SPI can adapt to any SPI‑LED strip.

PRO DMX 2:

DEVICETOOL:

DEVICETOOL:

Compatible Software

Lighting control software

Our new DMX controller – CLUB SPI can be integrated into scalable control systems designed for live performances or fixed installations, or deployed individually without a computer as an elegantly simple but sophisticated standalone control solution.

PRO DMX 2

Live lighting control and stand-alone programming.

PIXXEM

Pixel mapping, DVI capture and video.

STUDIO DMX

Real-time 3D viewer.

WI LIGHT

Free iOS and Android app: commands over the local network or the internet.

All our Lighting Management Software are Free and require a Chromateq™ Device or Interface to transform your computer into an impressively adaptable and effective DMX Controller.

Accessories

Infrared Remote Unit Operation

Module Infrared 25
Module Infrared 01
Module Infrared 02
Module Infrared 03
Module Infrared 04
Module Infrared 05
Module Infrared 06
Module Infrared 07
Module Infrared 08
Module Infrared 09
Module Infrared 10
Module Infrared 11
Module Infrared 12
Module Infrared 13
Module Infrared 14
Module Infrared 15
Module Infrared 16
Module Infrared 17
Module Infrared 18
Module Infrared 19
Module Infrared 20
Module Infrared 21
Module Infrared 22
Module Infrared 23
Module Infrared 24

Infrared Remote Unit

Each button play a event.
Buttons 1 to 15 must be assigned to a event number via the software before load the show in memory.

—–
Buttons 1 to 15 are available with single zone project.
Buttons 1 to 9 are available with multiple zone projects.
Select a mode speed, dimmer, colour and use + and – buttons.

Number 2

In Scene Mode, each button triggers a different event. Buttons 1 to 15 must be assigned to a event via the software.
—–
Trigger 1 to 15 in Mono-Zone.
Trigger 1 to 9 in Multi-Zones.

Preset values 1 to 9 in Speed Mode, Dimmer Mode, Colour Mode.

Number 3

In Scene Mode, each button triggers a different event. Buttons 1 to 15 must be assigned to a event via the software.
—–
Trigger 1 to 15 in Mono-Zone.
Trigger 1 to 9 in Multi-Zones.

Preset values 1 to 9 in Speed Mode, Dimmer Mode, Colour Mode.

Number 4

In Scene Mode, each button triggers a different event. Buttons 1 to 15 must be assigned to a event via the software.
—–
Trigger 1 to 15 in Mono-Zone.
Trigger 1 to 9 in Multi-Zones.

Preset values 1 to 9 in Speed Mode, Dimmer Mode, Colour Mode.

Number 5

In Scene Mode, each button triggers a different event. Buttons 1 to 15 must be assigned to a event via the software.
—–
Trigger 1 to 15 in Mono-Zone.
Trigger 1 to 9 in Multi-Zones.

Preset values 1 to 9 in Speed Mode, Dimmer Mode, Colour Mode.

Number 6

In Scene Mode, each button triggers a different event. Buttons 1 to 15 must be assigned to a event via the software.
—–
Trigger 1 to 15 in Mono-Zone.
Trigger 1 to 9 in Multi-Zones.

Preset values 1 to 9 in Speed Mode, Dimmer Mode, Colour Mode.

Number 7

In Scene Mode, each button triggers a different event. Buttons 1 to 15 must be assigned to a event via the software.
—–
Trigger 1 to 15 in Mono-Zone.
Trigger 1 to 9 in Multi-Zones.

Preset values 1 to 9 in Speed Mode, Dimmer Mode, Colour Mode.


Buttons 1 to 15 must be assigned to a scene via the software.

Number 8

In Scene Mode, each button triggers a different event. Buttons 1 to 15 must be assigned to a event via the software.
—–
Trigger 1 to 15 in Mono-Zone.
Trigger 1 to 9 in Multi-Zones.

Preset values 1 to 9 in Speed Mode, Dimmer Mode, Colour Mode.


Buttons 1 to 15 must be assigned to a scene via the software.

Number 9

In Scene Mode, each button triggers a different event. Buttons 1 to 15 must be assigned to a event via the software.
—–
Trigger 1 to 15 in Mono-Zone.
Trigger 1 to 9 in Multi-Zones.

Preset values 1 to 9 in Speed Mode, Dimmer Mode, Colour Mode.

Zone A | 10 In multi-zone mode, press the A, B, C, D and E buttons to control a zone. Press the Global Zone [ ] to activate each zone simultaneously.
Zone B | 11 In multi-zone mode, press the A, B, C, D and E buttons to control a zone. Press the Global Zone [ ] to activate each zone simultaneously.
Zone C | 12 In multi-zone mode, press the A, B, C, D and E buttons to control a zone. Press the Global Zone [ ] to activate each zone simultaneously.
Zone D | 13 In multi-zone mode, press the A, B, C, D and E buttons to control a zone. Press the Global Zone [ ] to activate each zone simultaneously.
Zone E | 14 In multi-zone mode, press the A, B, C, D and E buttons to control a zone. Press the Global Zone [ ] to activate each zone simultaneously.

Global | 15

In multi-zone mode, press the A, B, C, D and E buttons to control a zone. Press the Global Zone [ ] to activate each zone simultaneously.

Increase | 16

Selects next scenes
—–
Increase the value of the
selected mode:
– Scene +/-
– Dimmer +/-
– Speed +/-
– Color +/-

Pause | 17

Freezes the current scene in its state

Blackout | 18

Stops the current scene and plays the scene 00. All DMX levels are set to zero.

Decrease | 19

Selects previous scenes
—–
Decrease the value of the
selected mode:
– Scene +/-
– Dimmer +/-
– Speed +/-
– Color +/-

Speed Mode | 20

Select Speed Mode to modify the selected zone speed.


Press keys 1 to 9 to select a preset speed : 5 is the default speed, 1 is the minimum speed and 9 is the maximum speed.


Press (or hold) keys + and – to adjust the speed value.

Dimmer | 21


Select the Dimmer Mode to modify the selected zone dimmer.


Press keys 1 to 9 to select a preset dimmer, the 9 key corresponds to a 100% dimmer value.


Press (or hold) keys + and – to adjust the dimmer value

Release color mode | 22

Color Mode | 23

Select the Colour Mode to modify the selected zone colour.

Press keys 1 to 9 to select a preset colour : 1-Blanc, 2- Rouge, 3-Orange, 4-Jaune, 5-Vert, 6-Cyan, 7-Bleu, 8-Violet, 9-Magenta.

Press (or hold) keys + and – to adjust the colour value

Scene Mode | 24

Select the Scene Mode to trigger events.

Press keys 1 to 9 in multi-zone mode and buttons 1 to 15 in mono-zone mode to select events.

Press (or hold) keys + and – to scroll through the events one by one.

One IR Remote unit is included in CLUB SPI package.
DIN Kit - Universal Rail Mounting

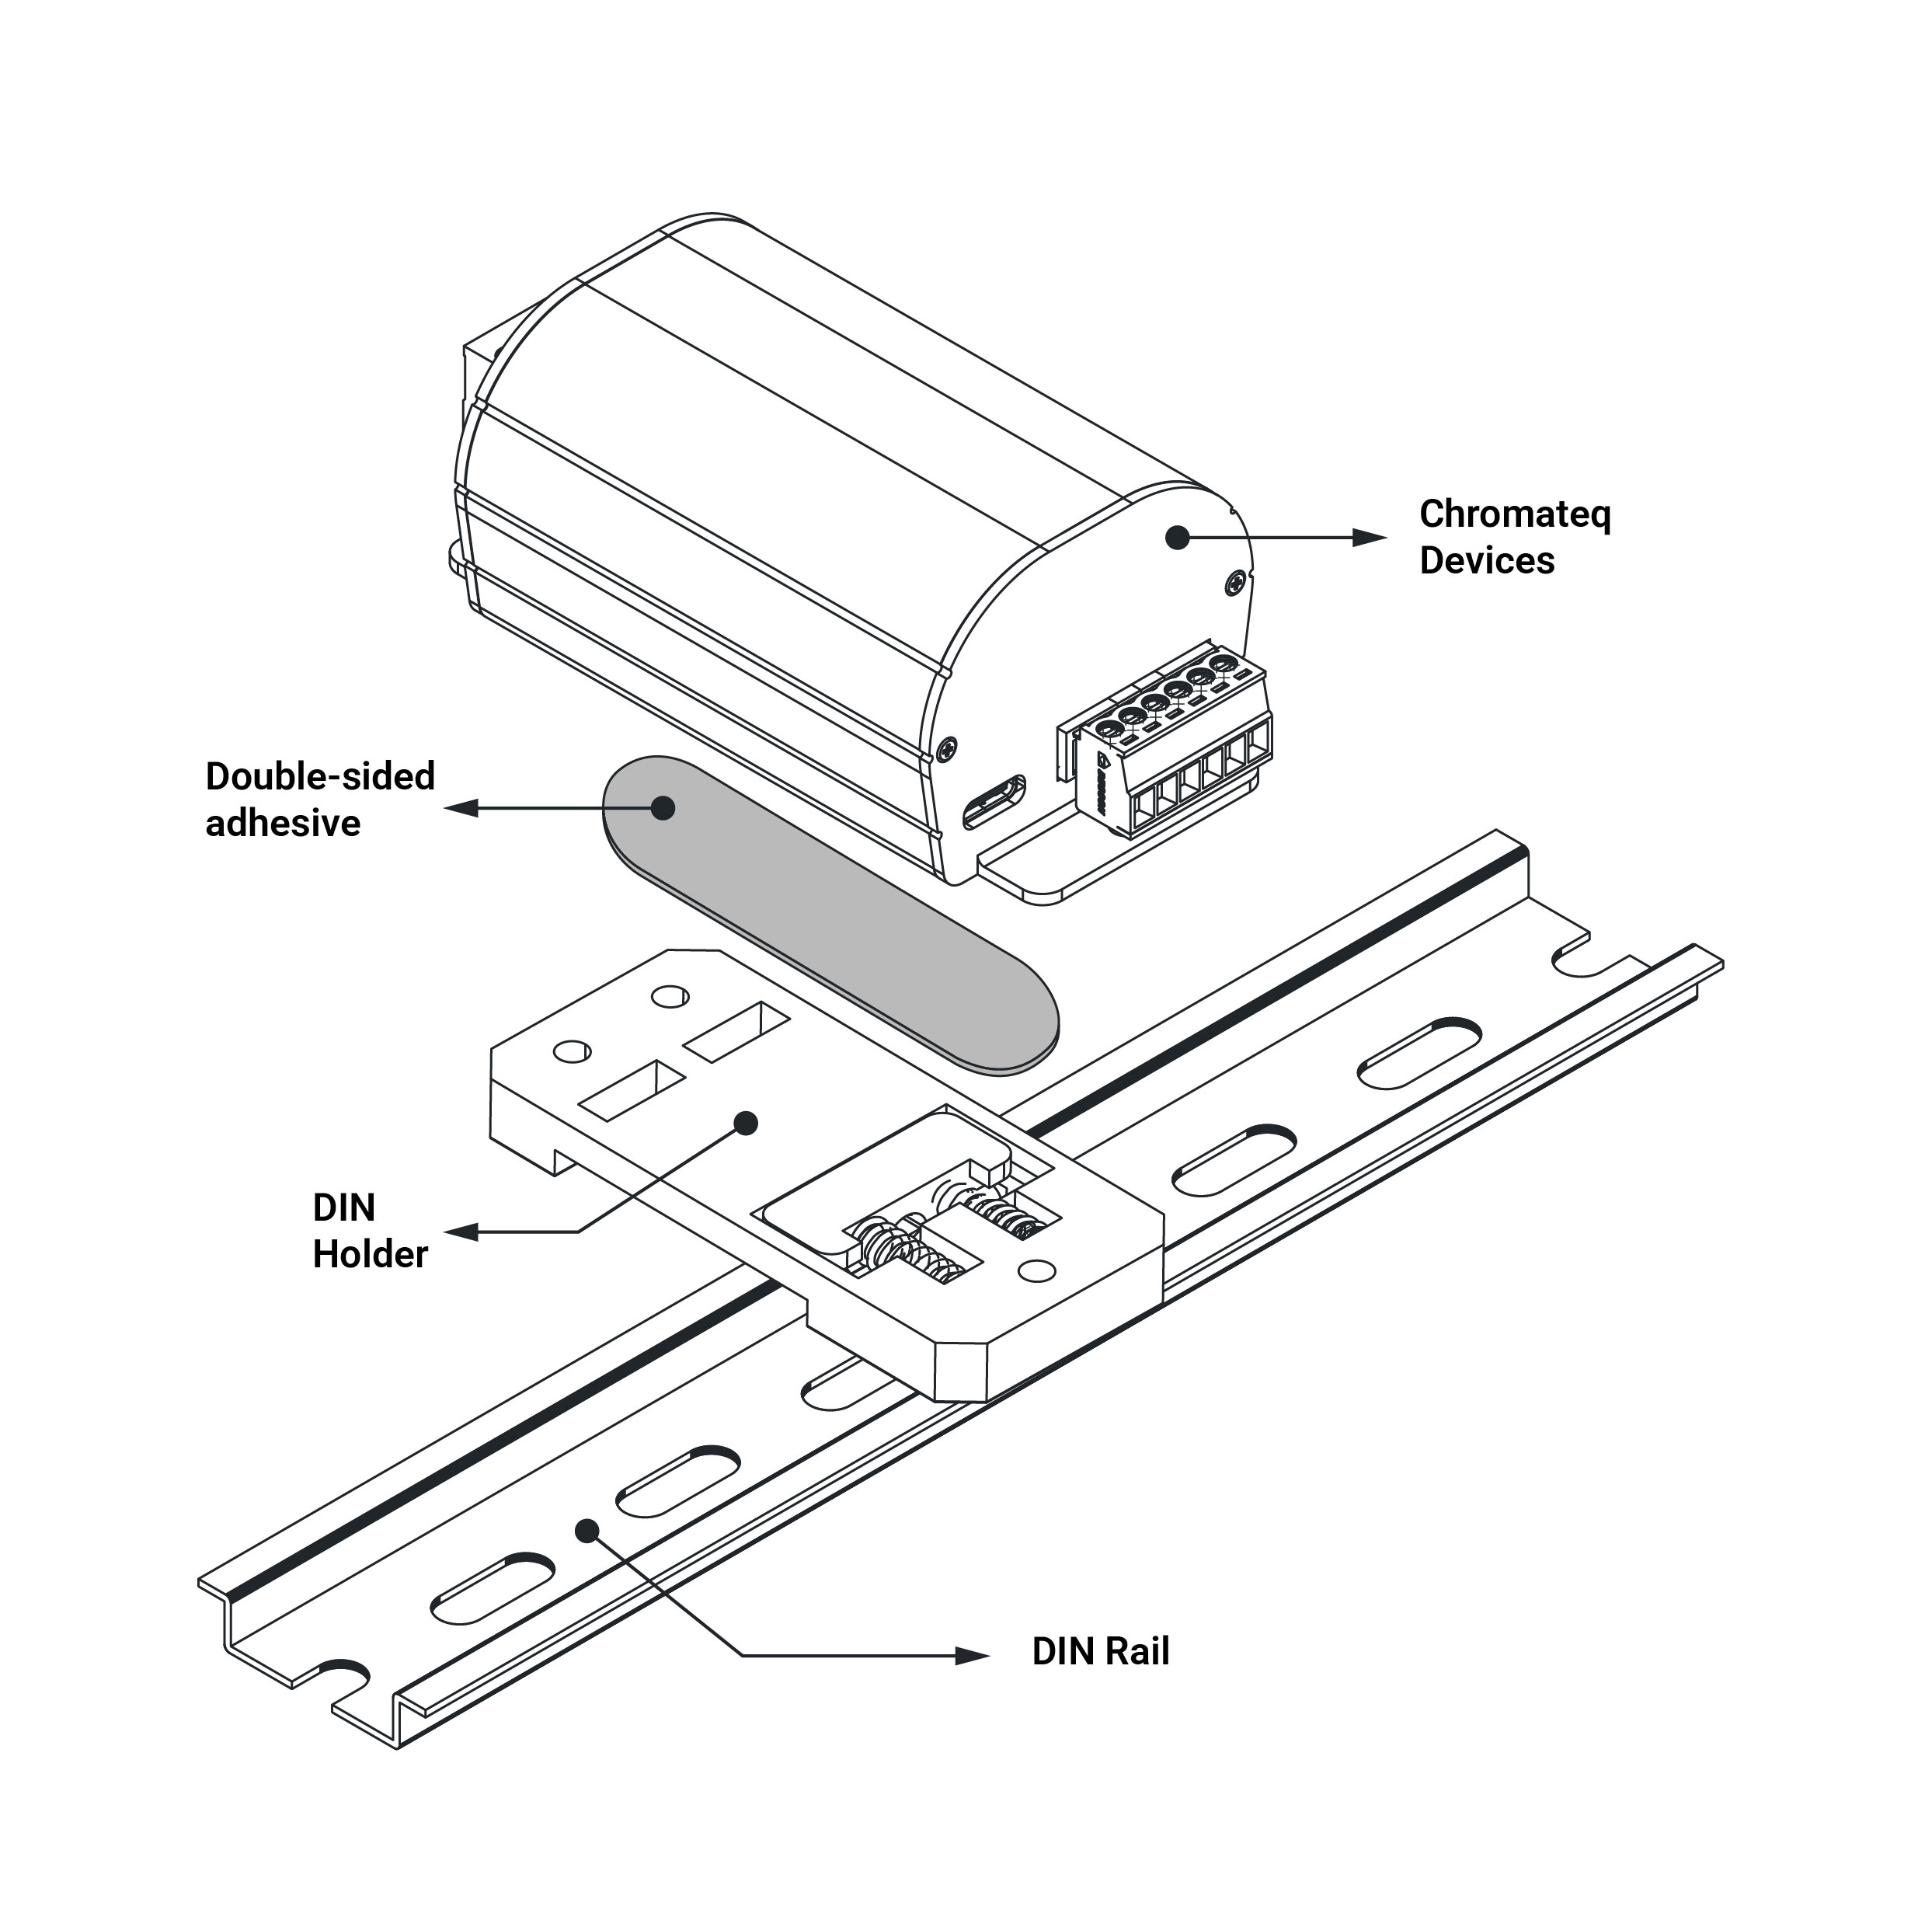
The DIN Rail Holder Kit is an easy and convenient mounting solution designed to easily attach any Chromateq devices to a standard DIN rail. Engineered for integrators, installers, and technical environments, it ensures a clean, secure, and reliable installation inside electrical cabinets, control panels, and industrial systems.

It is fully compatible with all Chromateq products, providing fast and seamless integration for projects requiring DIN rail mounting. The DIN holder is attached to the back of the case using a strong, sturdy double-sided adhesive (3M).

Available upon request when placing your order.
Price of the DIN Kit: 20€ (excluding VAT).

Main Features

Hardware & DMX (Software & Live)

CLUB SPI

Retail Price (excluding VAT)

€259 / $309

DMX with PRO DMX 2, PIXXEM

512 (In/Out) per device, RDM

SPI Out (Data + Clock) with PRO DMX 2, PIXXEM

1x 10²⁰ Px. / 3072 Ch. at 15 fps in USB to 25 fps in Stand-alone

DMX to SPI converter (LED Driver)

3072 channels, 170 RGB or 128 RGBW pixels

Converter Options

Pixel Grouping, Start DMX address, Pixel repeating, RDM

RDM (dual DMX data directions, DMX addressing)

Yes

USB-C compliance

Yes (5V DC, 0.2A)

Upgradable on site

Yes, UxU (add Art-Net Universes)

Max connected devices

10 by USB

International Warranty​

3 Years

Dimensions (mm / in)

H : 103 (4.06 in ) / W : 50mm(1.96in) / D : 37,5mm (1.47in)

Weight / Operating Temperature / Certification

0.1 Kg (0.22 lb) / -40 to +85 C° / CE, FCC, RoHS

Stand Alone

DMX Out (16-bit channels) and SPI

512 Ch. DMX in/out and 3072 Ch. SPI out

DMX to SPI LED converter / driver / Encoder

512 Channels, pixel grouping, Pixel repeating, start address

Zone (Scene play a time)​

1 (DMX + SPI)

Memory Step capacity​

256 Mb, 8000 steps for 7U (1 DMX + 6 SPI)

Max scene capcity​

512

Power Input

9-24V. DC, 5V. USB, 0.2A, 0.7W​

Triggers (Stand Alone)

Smart dry Contacts (on, on/off, release, commands)

3 pins (Trigger on Ground)

Infrared IR remote (play/stop/pause, dimmer, speed)

Yes

DMX in

Yes, 512

Software Options

Software

CLUB SPI

PRO DMX 2, PIXXEM, STUDIO DMX

512 DMX (In/Out) + 3072 SPI Out per device

Audio Timeline

Optional (need FULL* Upgrade)

Wi-Light - Mobile APP / API

Software control only from a mobile and LAN

Worldwide Technical Support​

Yes, English, French, Chinese​​

*FULL: +RDM + 24hTimeline + Multi timeline + Timeline Live record + 3D unlimited + MIDI Time Clock + SMPTE + PC Calendar & Clock Triggers.

Art-Net, sACN, DVI, DMX in/Out

ART-NET, sACN Output (PRO DMX 2 / PIXXEM)

Optional (max 64U / 512U), need upgrade

DMX Input, control and Record

512 + RDM

ART-NET, sACN Input, control, triggers, record

Optional (max 16U)

DVI supported resolution (PIXXEM)

Optional (max 1920*1080)

Triggers

MIDI, RS232, Wi-Light, UDP, Keyboard, Hyperlinks

Yes

MIDI Control, Audio BEAT, BPM, Wi-Light, UDP

Yes

User Interface customization

Yes

Support and Download

Below you will find all the documents and files related to the PoE NODE and Chromateq.
(Certificates, user manuals, datasheets, photos, 3D object file, and more…)